My daughter wears an amber necklace all. the. time. Some people think I'm nuts, but it helps with teething. Really! She has had zero symptoms of teething and has 6 teeth. She doesn't drool either, and I definitely think it's related. She wakes up in the morning and has new teeth. [For those of you who may be concerned about choking, don't worry, the clasp will break if it get caught on something, and we wrap it around her ankle for night time.] Now that I'm pregnant with number 2, I need to get the new baby an amber necklace as well.
How does it work? Amber is a natural resin. As your body warms the amber, it releases oils containing succinic acid, which is absorbed into the skin, and then the bloodstream. Amber has been known as a natural remedy for pain relief for hundreds of years. And it's not just for babies! Adults use amber to relieve joint and arthritis pain, and even carpal tunnel.
Hazelaid.com is giving one lucky reader down at Green's Going Green a $25 gift certificate!! Hurry on over to enter this great giveaway! Also if you see their jewelry and just must get some now, they have a discount code for 21% off during the Canada Post strike. They will ship when the strike is over, and you get a great discount! I'll be making my purchase as soon as I can decide which colors I want for the new babe!
~Kim~
Tuesday 21 June 2011
Friday 25 March 2011
Blog Sewing Challenge - Week 7

This week I've joined in on the Crafty Sewing Mamas blog sew-a-long. The challenge this week was to make something for food storage or a car organizer, then blog about it. Baby K is not quite at the stage of needing a car organizer yet, so I took this opportunity to make my husband a new lunch bag.

He requested something roomy. I think it's more accurate to just call it huge. The finished dimensions are 9" X 9" X 7 1/2". I used this tutorial from the long thread.

Some things I would do differently if I were to make this again would be:
1. Make it not quite so huge (my husband insisted on this size, so I didn't have much choice.)
2. Make little cutlery holder type pockets.
Well, I hope my husband is enjoying his new lunch bag today, although he did tell me when I was finished that it looks like a purse. Hehehe...
I look forward to seeing you at the next challenge!
~Kim~
2. Make little cutlery holder type pockets.
Well, I hope my husband is enjoying his new lunch bag today, although he did tell me when I was finished that it looks like a purse. Hehehe...
I look forward to seeing you at the next challenge!
~Kim~
Tuesday 22 March 2011
Chocolate Chip Cookies! Yum!

I made chocolate chip cookies last night, and this is what's left of them. There were about 60, but I brought some to coffee this morning to share, sent some for the FIL, and brought some to the barn where I used to work. They are chewy and delicious. Want some? Here's the recipe. Don't worry if you can't bake, these are un-flopable.
Chocolate Chip Cookies
2 1/4 cups flour
1 tsp. baking soda
1/2 tsp. salt
Mix in separate bowl.
1 cup butter or margarine
3/4 cup brown sugar
3/4 cup white sugar
1 tsp. vanilla
2 eggs
Cream together. Mix in flour ingredients.
Stir in
2 cups chocolate chips
optional: 1/2 cup walnut pieces
Drop by the spoonful or cool, roll into 1 inch balls and press onto an ungreased cookie sheet. Bake at 350 F for 8 minutes.
Enjoy!!!
~Kim~
Thursday 17 March 2011
Sewing machine cover tutorial
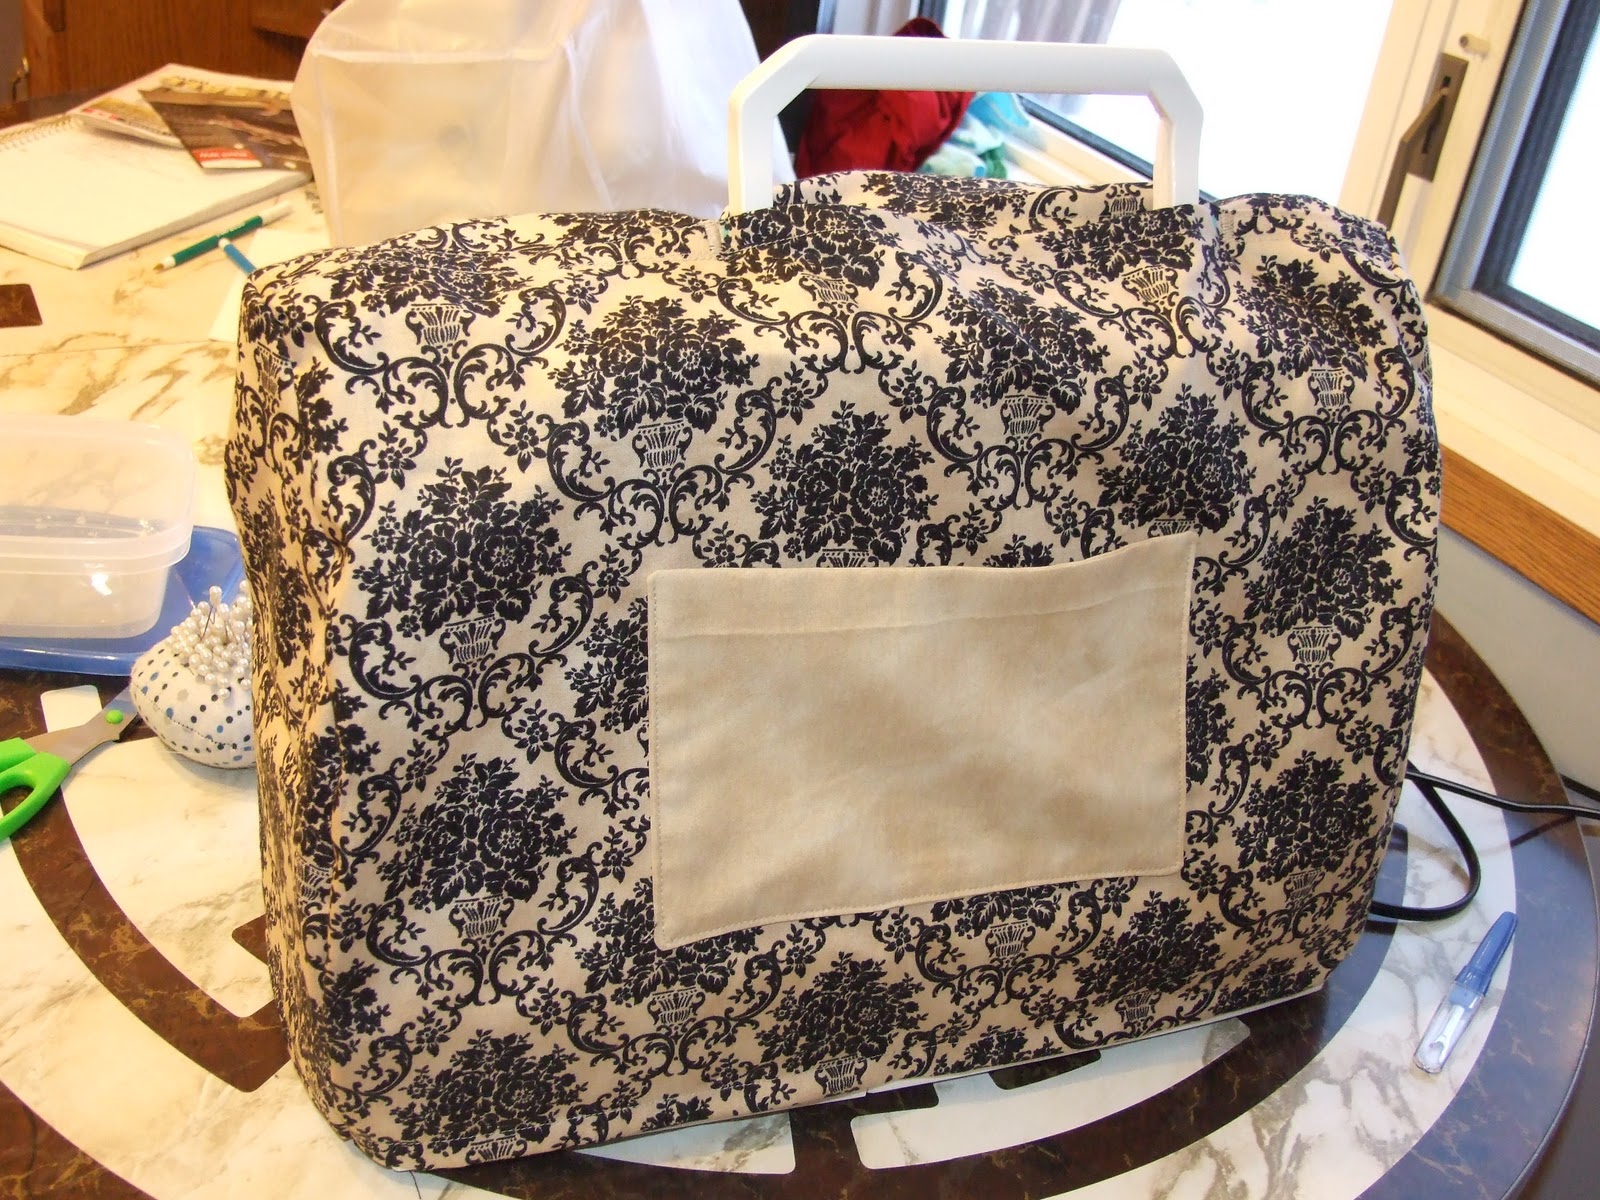
Here is the sewing machine cover I made. Before we start the tutorial I want to tell you that my finished product is slightly different than yours will be. I wasn't using my brain enough before I started, but I fixed up the tutorial so you should not have any problem with it! I ran into my troubles when I started to pin the sides, and realized that it would have made much more sense to make the cover more box like for easy assembly! I hope this is clear enough, as it's my first tutorial. Now with that out of the way, let's get started!
First we will need to take measurements of your machine so we know what size to cut the fabric. Measure side to side on the longest part of your machine, round up a bit if you have to. This is the length, mine is about 17 inches.

Next, measure the height of your machine. Mine is 12 inches.

Then, measure the width of your machine along the side at it's widest point. Mine is 7 inches. I didn't take a pic of this, but you get the idea.
Now for the math. My numbers are in brackets.
Top measurements:
Take the height of your machine (12) X 2 = (24) + the width of your machine (7) = (31) + 3 = (34) / 2 = (17) I did this because we are going to make an overlapping handle slot.
Now take the length of your machine (17) + 1 inch [for 1/2 inch seam allowance on either side and a little wiggle room.] = (18)
Side measurements:
Take the width of your machine (7) + 1 inch [again for seam allowance and wiggle room.] = (8)
Take the height of your machine (12) + 1 1/4 [for seam and hem allowance] = (13 1/4)
Cut 2 pieces of fabric your final length (18") by your final height (17") We will call these your front and back pieces.
Cut 2 side pieces your final width (8") by your final height on the sides (13 1/4")
Optional pocket: Cut 2 pieces 6" by 9" I used a different fabric for my pocket for contrast.

We will start be preparing the pocket. Take your 2 pocket pieces and pin them right side together. Mark a 2" space on one of the long sides to leave open for turning your pocket.

Starting at one of your markings, sew around the pocket piece on all sides until you get to the other mark. Clip the corners and turn your pocket piece. Press, being sure that the edges of the fabric in the opening you left are tuned inward.

Set your pocket aside for now and take your front and back pieces. We want to hem the top and bottom of both of these pieces. Take one piece and along the top side (the final length of your machine, mine was 18") fold and press 1/4". Fold 1/2" enclosing your raw edge and press again. Do the same to the bottom of your piece.

Take the other piece and do the same. While you are there, take your side pieces and hem only the bottom, folding 1/4", then 1/2". Take all 4 pieces back to your sewing machine and sew up your hems along the edge to secure.

Now it's time to apply the pocket. Take your front piece and place the pocket where you would like it to sit. I placed the bottom of my pocket about 3 1/4" from the bottom edge. Make sure when you position your pocket piece that the opening you left to turn it is on the bottom. Pin your pocket into place.

Sew on the pocket, starting on the top right corner going down the side, across the bottom, and up the other side. Your pocket is done!


Drape your pinned pieces over your machine and put the handle up through the center of the overlapped pieces. Place pins on either side of the handle to determine where you will sew your pieces together. This may take a bit of adjusting. Be sure that your cover is centered on the machine.


I marked the sides of where I want my handle slot with a fabric marker so I could reposition the pins for sewing.

Sew along both edges of your hem so you will have 2 lines of straight stitching on either side of your handle slot. Do a tight zig zag to reinforce the edges of the handle slot. I had my stitch length set to 2.

Pin your sides into place making sure that the right sides are facing. Start at the bottom hem to ensure that it is lined up properly. It might take a bit of playing with the placement around the top corners. I forgot to take a picture of this! Sorry!
When you are happy with how it fits, sew up the seam. Finish the seam with a zig zag stitch or serger.
Turn your cover right side out, place it over your machine and admire your work!
~Kim~
Wednesday 16 March 2011
Pretty little summer top

I'm so happy with how this came out! I started this lovely little top last Saturday. Things were going so great. Then, something terrible happened... I ran out of pink thread! I had to wait all the way until Tuesday before I could buy more. So on Tuesday, after Baby K woke up from her nap, I went into town to pick up my thread. I was very excited to finish my top, but since it was such a beautiful day (+2 degrees Celcius,) We just had to go out for a walk.
 |
| Excuse the squinty eyes, it was so sunny! |
Of course after we went for a walk I was busy making supper. We had taco salad and it was delicious! Then, after supper, I finished up the top. It was so quick and easy. Please excuse the poor picture quality!


I made it based on my own version of From An Igloo's "In the Garden" Shirred Twirly Dress. I must say, I just love that dress! I love it so much that I also made a version of it for Baby K's birthday, which is quickly approaching! Her first birthday is on Easter, April 24. You will all get to see the lovely ensemble that I have made up for her then.
And no, I haven't forgot about the sewing machine cover tutorial. It is in the works, and is going well despite a small hiccup. Don't forget to check it out!
~Kim~
Monday 14 March 2011
In the beginning...
It all started with a simple thought. “I can make that.” I never imagined that my trivial dilemma (although it seemed so important at the time,) of not being able to find a crib skirt long enough for my tastes, would turn into such a wonderful learning experience and hobby. I’m not an expert seamstress by any means, but I am learning how to sew. I’d love to share my messes and successes with you through this blog, and maybe you’ll join me with some of my projects. Surely if this novice sewer can do it, you can too.
By the way, my name is Kim. I have an 11 month old baby girl, who I will call Baby K on this blog. I made this blog because I absolutely love sewing blogs. I figured I'd give making my own a whirl. I can't promise it will be great, but I certainly will try. I think a tutorial is in order for the near future. I need a new sewing machine cover. Badly. Baby K ripped my junky plastic one all to shreds. I was searching for a tutorial that I liked for a sewing machine cover that had a handle slot. Most of them didn't have one, and the one I did find I was not a big fan of, so I have a little thought in my head. Do you need a new sewing machine cover? If you do, maybe you will consider making one with me.
Now I will leave you with a look at where it all began.
 | |
| Curtains and crib skirt for baby K. My first sewing project, just over a year ago. |
I hope you'll join me soon for some fun making a new cover for your sewing machine!
TTFN!
~Kim~
~Kim~
Subscribe to:
Posts (Atom)